Can I Charge Lipo Battery on 5v With Dw01k?
Introduction
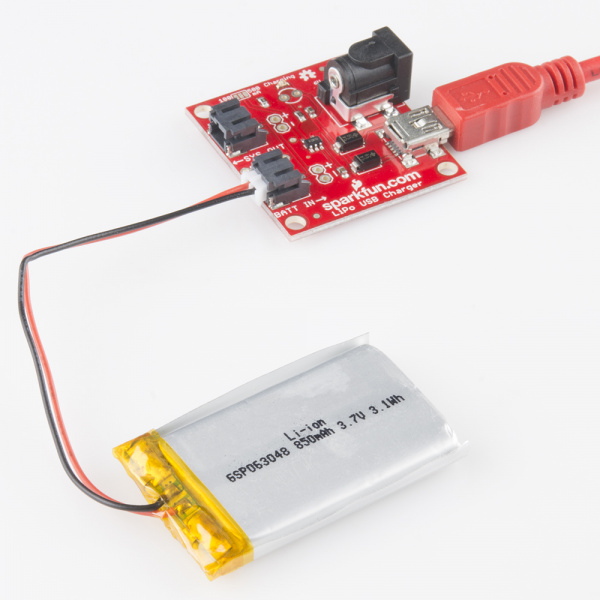
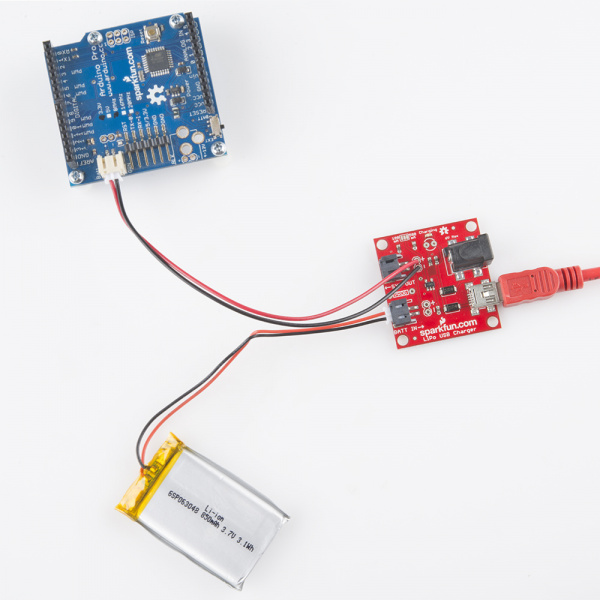
We love LiPo batteries! They pack a walloping, power-supplying punch in a tiny, flat package. And, they're incredibly easy to recharge, when that time comes. If you're looking to brand your project mobile and easily rechargeable, we tin can't recommend this pairing enough: an 850 mAh LiPo battery and an embeddable USB LiPo charger.
This tutorial will explain how to utilise the USB LiPo Charger with any of our single-cell LiPo batteries. We'll focus on the LiPo Charger and Battery Retail kit, simply this information can be practical to that charger and any compatible bombardment.
Required Materials
- USB LiPo Charger
- A single-jail cell LiPo battery
- The charger can be made to work with batteries of whatsoever capacity, including 40mAh, 110mAh, 400mAh, 850mAh, 1000mAh, 2000mAh, and the 6000mAh fatpack.
- A 5V ability source, options include:
- A calculator USB port with attached mini-B USB cable
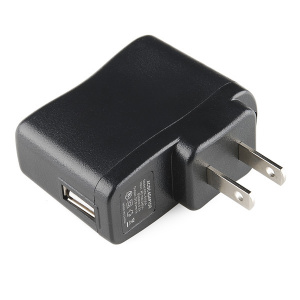
- A USB Wall Adapter and mini-B cable
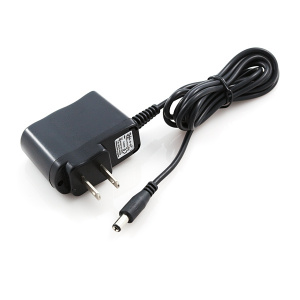
- A 5V Wallwart Supply
Suggested Reading
Battery Technologies
The basics behind the batteries used in portable electronic devices: LiPo, NiMH, coin cells, and element of group i.
Inputs and Outputs
On this page, we'll dissect the USB charger, examining all of the inputs, outputs, and specifications of the board.
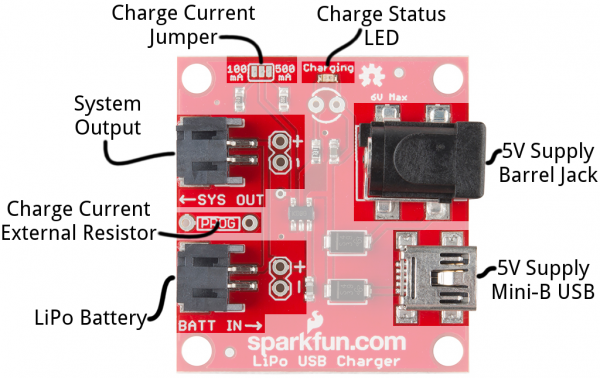
Charger Input -- Power Supply
First, you'll need something to supply power to the charger, and then it tin regulate power to the battery. Connect your power supply to one of these two inputs: a butt jack (v.5mm outer bore, 2.1mm center pole, eye-positive) or a mini-B USB connector.
Your power supply voltage should exist between 4.75 and 6V. A 5V USB supply -- from a mini-B cable continued to either a estimator USB port or wall adapter -- makes for a perfect ability source. Or, if you lot want to utilise the barrel jack input, nosotros recommend the 5V wall adapter.
The current requirements of the supply will depend on how yous've set the charge electric current on the lath. By default, the charge electric current is set to 500mA, and so make sure your supply can handle that. Computer and laptop USB ports are most doubtable here; 500mA is the divers max a port can supply, and oftentimes they're set to have an fifty-fifty lower output than that (due east.m. 100mA).
You can safely attach both a 5V wall-wart and USB supply to the board. There is some protection (diodes!) on-board to preclude reverse current. The higher-voltage supply will source power to the chip.
Warning: While the flake can take upwardly to 6V for the maximum voltage, information technology tin only take 1500mA for the max electric current. If you utilize the 6V/2A power supply as the power supply, so you are very likely to burn the chip out on the lath. If you need a wall adapter with a butt jack, then we recommend the 5V/2A ability supply.
Charger Output -- Single-Jail cell LiPo Battery
Once you've connected a power supply to your charger, the next step is to connect a battery. This board will only charge a very specific battery, make certain it meets these requirements:
- Unmarried-Cell Batteries Only -- Your LiPo should accept a nominal voltage output of about 3.7V, and get up to around 4.2V at a full charge. That means single-cell LiPo's merely. If you lot take a multi-cell battery -- something with a nominal voltage of seven.4V or more -- this isn't the charger for you.
- Battery Chemistry -- The charger will simply piece of work with Lithium-Polymer or Lithium-Ion batteries.
- Capacity Considerations -- To avert explosions (which are only very briefly fun), you shouldn't accuse these LiPos at a current over 1C. That means a 500mAh battery shouldn't be given a charge current over 500mA, a 100mAh shouldn't be charged higher than 100mA. This board is designed to accuse at 500mA out-of-the-box, but information technology's easy enough to alter that rate. Run across the next page if your bombardment'south chapters is under 500mAh.
All of our compatible batteries are terminated with a white JST connector, which you can plug directly into the mating black connector next to the BATT IN→ label. If your battery is terminated with some, weird, not-JST connector, you tin can also use the un-populated 0.1"-pitch header directly behind the JST connector. Wires or other connectors can exist soldered to this header, if desired.
System Output
The LiPo USB Charger is designed to be easily embeddable inside a project. The ←SYS OUT connector allows you lot to connect your battery output to the remaining parts of your project.
You tin can use the "SYS OUT" header to power a 3.3V Arduino Pro. All while leaving your battery continued to the charger.
Every bit with the battery connectedness, you lot can use either the JST connector or the nearby 0.ane"-pitch header to connect your project.
The SYS OUT output volition connect your project directly to your bombardment. That means the battery supply voltage (somewhere betwixt three.6 and iv.2V) volition power your projection. Make sure you lot regulate that equally necessary.
Charge Status LED
The on-board ruby-red Charging LED can be used to get an indication of the charge status of your bombardment.
| Charge Land | LED status |
|---|---|
| No Battery | Floating (should be OFF, but may flicker) |
| Shutdown | Floating (should be OFF, but may flicker) |
| Charging | ON |
| Charge Complete | OFF |
If you want to add your own, larger LED, at that place'south an unpopulated footprint where you can solder either a 3mm or 5mm LED in the tiny (but bright!) red LED's stead. Make sure yous get the polarity right, though.
Setting the Charge Current
Before you plug a battery into the charger, you lot should exist aware of your battery's capacity and the charge current supplied by the charger. To be safe*, yous should proceed the charge current at or below 1C of your battery. That means you should charge your 850mAh battery at 850mA or less, and a 100mAh bombardment at 100mA or less.
The accuse electric current controls how fast your battery will charge. If you have a 1000mAh battery, charging at 1000mA will fully charge that battery in i hour. Charging it at 500mA will hateful a full charge takes twice every bit long -- 2 hours. And then more charge electric current is better...as long as it doesn't exceed your bombardment'south specifications.
The featured component on the LiPo USB Charger board -- an MCP73831 -- has a programmable accuse current feature. It can exist set to deliver anywhere betwixt 15mA and 500mA to a battery. To program that value, a resistor is connected from the PROG pivot to basis. In that location are already two resistors on-board, which tin can fix the charge electric current to either 500mA and 100mA. A small jumper is used to select betwixt those. You can also add your ain resistor, to set a custom charge current.
Jumper-Selecting
Side by side to the charge-condition LED in that location are three bare pads that grade a 2-fashion jumper. The center pad connects to the MCP73831'due south PROG pin, and the outer ii pads connect to a pair of resistors. The labels next to those outer pads indicate the charge current that they set.
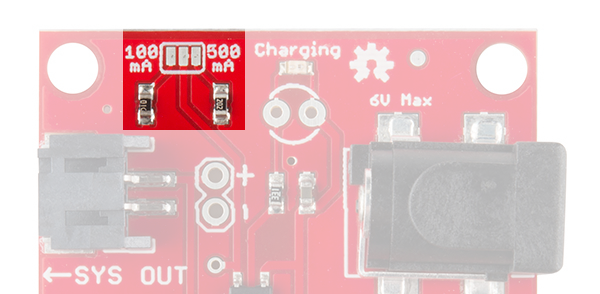
If you wait actually closely at that jumper, you lot may see a small trace connecting the centre pad to the 500mA-labeled outer pad. As such, this lath is configured to deliver a 500mA current by default.
To change the charge current to 100mA, you'll demand to cut that pocket-size trace betwixt the pads (a hobby knife is recommended), and apply a solder hulk to connect the 100mA-labeled pin to the center pad.
Custom Accuse Current
If neither 100mA or 500mA volition piece of work for you, at that place is an unpopulated resistor footprint to permit you to set a custom charge current.

Before calculation the resistor, disconnect both jumpers discussed in the section above. And so use this equation to select your resistor:

For example, if y'all want to charge a 400mAh battery at exactly 400mA, solder in a ii.5kΩ resistor (y'all may accept to series a 2.2k and 330).
* Well-nigh batteries include over-current protection -- implemented on the little circuit board under the xanthous record -- which will proceed the battery from blowing up if yous supply too much current. Only information technology'south best to non rely on that circuit: y'all'll relieve power and your sanity.
Resources and Going Further
- LiPo Battery Intendance Tutorial -- An older tutorial, merely much of this info however holds true. This will give yous some info on strain relief, and some hints on safely disconnecting a battery from the charger.
- USB LiPo Charger Schematic -- If you lot accept whatever circuit-level questions about the LiPo charger, check out the schematic.
- MCP73831 Datasheet -- Get the low-downward on the MCP73831 unmarried-cell LiPo charge management IC.
- USB LiPo Charger GitHub Repository -- This is where we keep the most up-to-date design files.
Now that yous've got a replenishable source of power, how are you going to employ it? Need some inspiration? Check out these tutorials:
- Uh-Oh Battery-Level Indicator Hookup Guide -- Learn how to get together and apply the Uh-Oh Battery Level Indicator Kit. You'll be notified if your battery voltage falls likewise low.
- MYST Linking Book -- Use a LiPo to ability your very own Linking Volume from the classic computer game, MYST.
- Sunny Buddy Solar Charger Hookup Guide -- If y'all ever desire to replace the LiPo USB Charger with a solar charger, check out the Sunny Buddy!
Source: https://learn.sparkfun.com/tutorials/lipo-usb-charger-hookup-guide/all
0 Response to "Can I Charge Lipo Battery on 5v With Dw01k?"
Post a Comment